Friday, 13 January 2012

Ardweeny (Tiny Arduino Clone)

I built a tiny little Arduino compatible board tonight (with the hopes of using it in my Mindwave project).

It's really slick.  There are only 12 parts and all of them are through-hole - so you don't need to be really skilled with a soldering iron.

The plan is to use this with SparkFun's logic level converter to connect to the Mindwave USB dongle (I need the converter because the Ardweeny uses 5V signals and the USB dongle uses 3.3V).


Sunday, 8 January 2012

Taking Screenshots in iOS Simulator

I just came across this trick and thought that it is probably worth sharing with other iOS developers.

To take a screenshot in OS X, you can use the keyboard shortcut CMD-SHIFT-4

You could then use this to grab a screensnap out of the iOS Simulator, but this is a bit cumbersome.

The easier and faster way to do it is to fire up your app in the simulator, go to the EDIT menu and hold down the CONTROL key.  You can then select COPY SCREEN.

From there, you can paste it anywhere you'd like it.

Here are a couple of my screenshots from iOS Simulator:


Sunday, 1 January 2012

Frequency Shift Keying iPhone Project

This project is from the iPhone hacks book.

I've taken their example code and made some small edits (talked about in the previous post).

Direct download here: Download XCode Project Files

No Jailbreak Data Interfacing with iOS

So, I've been playing around with the mindwave and I've been working on a few (real world) work projects and I thought about integrating them.

The mindwave stuff I've already touched on here in the blog.

The work related stuff is mostly to do with mobile app development.  I've been working both with iOS devices and Android devices (both phones and tablets).  What struck me is how much easier it is to get data into an Android device as compared to an iOS device.

Apple does not make it easy to get data into their devices.

I tried using a Bluetooth module (Sparkfun's Bluesmirf).  No dice.

I looked at using a serial interface over the port at the bottom of the device.  This will only work on a jail broken device (and requires a fair amount of work even then.

Then I remembered seeing a project from Maker Faire written up in the Make Magazine Blog.  They did some data transfer over the headphone jack.  My first thought was that their was a serial port there (and perhaps in the newer iOS platforms there is), but it turns out that the system was using Frequency Shift Keying.  This is the same method used by old modems that worked over telephone lines.

Here are the articles that I'm working from:


So, to ring in the new year, I soldered up a (barely functional) connector that will work on a breadboard to interface between an iOS device and an Arduino (yet another work project toy).

Also, the source code for the iOS device is provided in the second link (ironically, under iPhone Source Code).  To get it to build under iOS 4.3, you need to make the following change:

In lockfree.h, the get function of the queue class needs to be modified.  If it's not modified you get the following two errors:

  • Invalid conversion from 'char' to 'const char*'
  • Initializing argument 1 of 'int remove(const char*)'

Change it from (Line 377):


// Pop a data item off the head of the list
bool get(T& data)
{
     return remove(data);
}

To:

// Pop a data item off the head of the list
bool get(T& data)
{
     return this->remove(data);
}


Finally, if you want to know how to get line numbers displayed in XCode 4, go to XCode/Preferences/Text Editing/Editing/Show/Line Numbers and make sure it's checked.

So, here's a video describing what I'm trying to do and where I've left off.  Enjoy.

Thursday, 22 December 2011

Mindwave with XCode

Here's my first functional project for Mindwave in XCode.  (This video is my third attempt to record - The frustration shows through at the beginning)

A few things for you to bear in mind:

Sometimes Mac OS X loses the Mindwave.  There are several ports that are reported and ThinkGear connector will not let you save the changes.  The port that seems to consistently work is /dev/tty.MindWave

If the port is saved as /dev/tty.MindWaveMobile-SPPDev or /dev/tty.MindSet-DevB, the installed software will not work.  I have not yet figured out how to save the port as /dev/tty.MindWave

Also, you will need to include the ThinkGear.bundle file in the XCode project.  (This can be found in the MindSet Development Tools along with a PDF describing how to add it to the project)


Tuesday, 20 December 2011

Got a Mindwave - time to start hacking

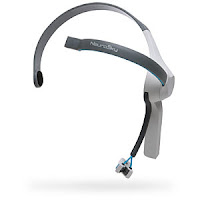
So, I ordered a Neurosky Mindwave from ThinkGeek.com and it arrived in the mail a few weeks back.

It's been sitting on my desk waiting to be hacked.

What is a Mindwave, you ask? It's a brain scanner.  You put it on your head, sync it up to your computer and software will begin to respond to your state of mind.

That doesn't mean that it will read your thoughts.  You can't dictate to the computer from inside your head or play advanced video games without a controller.  However, you can monitor and trigger responses based on your level of attention and meditation and eye blinks.

These three items let you do all kinds of interesting things.

The software that's included has a meditation journal, a display of fireworks that explode when you blink, a game where an and will roll a rock faster or slower depending on how hard you concentrate and a number of other applications.

So, what's the plan?

Well, I would like to confirm that I can actually read these values in real time from my computer.  Once I've done that, I will record those values to analyze later.

From there...I'm not too sure.

I'd like to try to integrate it with a microcontroller system like an Arduino.  If I can do that, then I can make things happen in the real world based on how hard I concentrate or relax.

Over the coming weeks, I will post the results of my experiments here.

Why another blog?

I have quite a number of web pages and blogs that I've set up over the years.  Why do I need another?

The truth is, I probably don't.  But, I wanted a place where I could put down some details of some really geeky projects that I'm working on and none of my existing sites really fits for that.  So, "Fun Geek Projects" is born.

I don't promise to have anything that is of much interest to anyone else.

I don't promise to write on a regular interval.

I don't promise that the posts will even be intelligible.

I plan to use this place as an outlet for some of the stuff bouncing around in my head (and on scraps of paper around my office).  If what appears in these posts helps you, please post a comment.  If you have suggestions, please comment.  If you think I'm an idiot... please DON'T comment. ;-)